Sunday, March 18, 2018

Marilyn Monroe Matchbook Mini Album Pocket Page

Hi crafty friends!! I'm back this month with a fun, easy to follow tutorial that I thought would be awesome as the themed for this 1st project of mine this month was "film themed" . I did a little twist on it though and made it featuring a photo of my favorite idol "Marilyn Monroe"! I was also inspired to make this not only from the very talented Kathy Orta but also from one of the designers from Maja Designs Cathy Mc Grath


Like I said, it was easy to make and if you enjoy making mini albums, this was just as much fun plus this can be added to any mini album as an extra area for photos, journaling, etc. Hope you enjoy this and if you would like to follow the tutorial that I followed from Kathy Orta just click Here

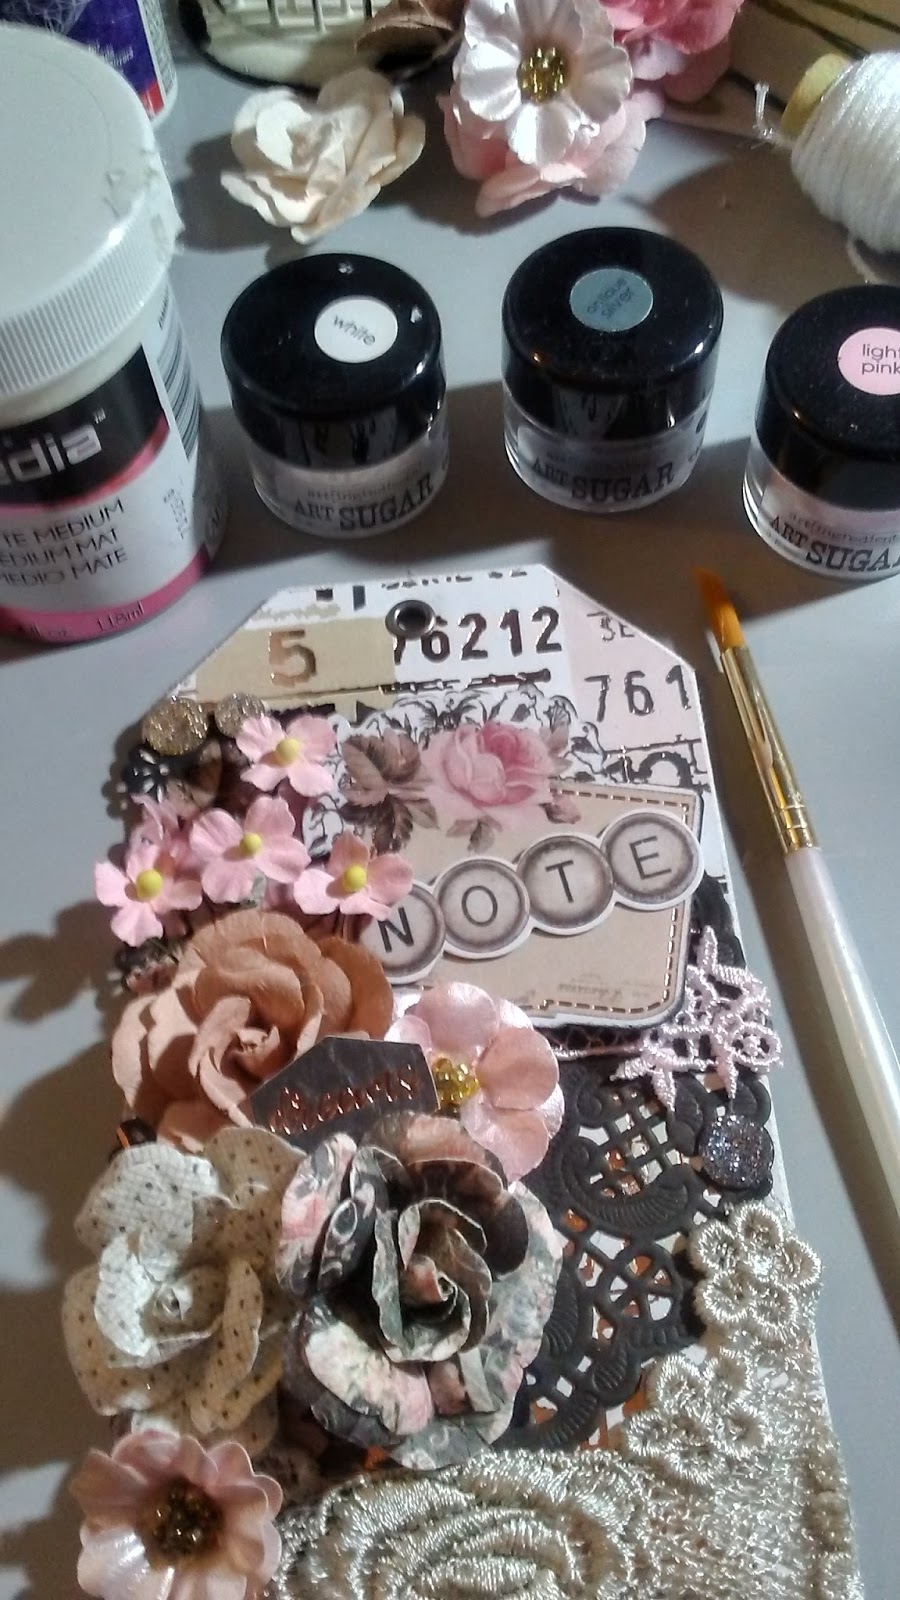
This project ong up as well as the previous tag I made , it is from the Prima Amelia Rose collection. I also used some of the stickers, a couple of die cuts from the collection and I had added a piece of lace on one of the areas but realized it would be a little too bulky if I used anymore. Not only did I use some scrap paper but I also used some of the journaling cards that come with this collection. I loved some of the sentiments so decided to use some of them up on this project as Marilyn Monroe herself had similar quotes. nly uses (1) 8.5  X 11 card stock, I used up some left over scrap paper that I had from a mini album I've been finishing up.


For this project I only had to use (2) of the adhesives from Helmar! I used the Helmar Acid Free Glue for adhering the entire design paper to the card stock as well as the photo of Marilyn Monroe.  Then for the piece of lace that I did use I used some of the Helmar Fabric Glue  as it has become another one of my favorite adhesives for my fabric and laces on any project! I also used some of the Tim Holtz Distress Inks in Bladck Soot to distress the edges of my design paper before adhering it to my card stock. 

I love the fact that in this project you have some small pockets for tags or even adding some 2.5 X 3.5 photo mats. In the video tutorial Kathy also added a little hinge to be able to get more use out of the pockets. I decided I just wanted to use some of the small die cuts where you can jot down a thought or two. 

Well this is my project for this week! I hope that you will look out for another one of my projects @ the end of this month which is already in the works! Please check out the rest of my design teams posts as well and check out the wonderful tutorial from Kathy Orta! There is so much projects we can make just by using our left over scrap papers! So till next time my crafty friends!! Hope you all have a wonderful and safe weekend!
                                                                                      ~Hugs~ Jeanne 


Saturday, March 10, 2018

What's been happening lately

I'm back and want to apologize once again for posting some of my previous projects from the past couple weeks or so late. I've been dealing with having to go once again for the iron infusions that I shared with you all when I was dealing with that in December 2017 onto January 2018.  The doctor says more than likely I'll have to do this every week for the rest of my life since it seems that as soon as I stopped getting these infusions, my body didn't retain the iron and so I was back at square one practically. 


I did some projects towards the end of Feb. but just didn't get the chance to post them on here. In the previous post before this one I posted about my 4x4 canvas I made for Canvas Corp Brands Creative Crew project.  I loved breaking into my product package that I had received from Canvas Corp. Here is the video I made sharing all of the goodies I received from CCB. 


I have posted up in one of my earlier blog posts my Feb. project for Helmar Adhesives, I'm also gonna be posting my second project for DebbysSpecialTouch on Etsy for the month of Feb. Which I have been enjoying the Heartfelt creations products.  This weekend I'll be sharing another project I just made for Debby's store also made a project using Heartfelt creations products from her Etsy store. 


                                                      πŸ‘¦πŸ‘¦πŸ‘¦πŸ‘¦πŸ’πŸ’πŸ’πŸ’πŸ‘ΆπŸ‘ΆπŸ‘ΆπŸ‘Ά


                                                       πŸ‘¦πŸ‘¦πŸ‘¦πŸ‘¦πŸ’πŸ’πŸ’πŸ’πŸ‘ΆπŸ‘ΆπŸ‘ΆπŸ‘Ά


                                         πŸ’–πŸ’–πŸ’–πŸ’–πŸ’–πŸ’–$$$$$$$$$$πŸ’–πŸ’–πŸ’–πŸ’–πŸ’–πŸ’–


Last but not the least of what else is going on I am excited to share that I will be a grandmother once again in June!! My daughter Destinee and her partner Jason are expecting a little girl who is gonna be named Jaylynn! So I'm preparing for that as well. Which luckily includes the magnificent gift I received from my husband and kids . I was given $$$$ to purchase all (4) Prima Marketing paper collections that were just released not too long ago! So I'm looking forward to all of the projects I'll be dishing out for my grandbaby!! So stay tuned and thank you for reading my post today . Luv u all! ~Hugs~ πŸ’–


P.S . In a few weeks I will begin my work from home business selling beautiful jewlery collections from Paparazzi!! Keep Ur πŸ‘€ open for that as well!! 

Canvas Corp Brands 4x4 Canvas Creative Crew Project

Good morning crafty friends!! I'm so excited to be sharing my first project that we were required to create for Canvas Corp Brands! This 4x4 canvas was sent in our Creative Crew product packages. I started on mine right away! I have recorded a video for YouTube sharing everything that I received from them to work with! 


I began by decoupaging some of the decoupage papers that I had received from the Helping Artists Program from DecoArts. It was a nice background. 


After I let it dry overnight I began adding the black trim all around the edges of the canvas. I then had picked out all of the embellishments that I wanted to use on this canvas. Our canvases were to represent our crafting style and personality. Since I love vintage projects and love dress forms, and most of all love Gypsy themes as well. I had this chipboard dress form that a friend had sent me a couple years ago in some birthday happy mail. There were a few different designs and I chose the one on here cuz its my favorite for vintage themes. I used Lindy's Stamp Gang Embossing Powder in "Cleopatra Copper" and embossed the top part of the dress form. The very top and the bottom part I used the Tattered Angels Glimmer Glaze in Black Olive. There is a large variety of colors of this product and I will be ordering more because I love how quick it went on the chipboard without needing any gesso. 


I had already decided that I really wanted to use the Architextures Parchment Rub-Ons (Pose) on my project . So I grabbed (2) of the 3 X 1.5 kraft tags that were in my product box. The rub ons that I chose were super easy to use , taking up no time at all! I absolutely love them and can't wait to use more in upcoming projects! I then distressed the edges of the tags using Tim Holtz distress ink in black soot. I then cut (2) small pieces of Jute Cord that comes in a ball. This was also another product from my Creative Crew Product Package. Then adhered them using Helmar 450 Quick Dry Adhesive which is one of my favorites! I then added a small clock embellishment from my stash , I added a wooden heart from the Prima Collection Salvage District collection , on the dress form and a small black/white cameo cabochon. I found a string of pearl/bling and added it to the bottom part of the embossed area on the dress form. 

I had also chosen some silver metal glasses and some pearl/bling pieces , I added the bling to the eye area of the glasses. Thought it looked unique and I loved that as the tags mention "See It In My Eyes"! I finished off my canvas by added some flowers of course from 49andMarket and Wild Orchid Craft flowers too. Topped it off with an adorable metal womans shoe that I had been saving specifically for a very personal project!

I truly am enjoying working with the amazing products from Canvas Corp, Tattered Angels, & 7 Gypsies! I am very honored to be a part of their Creative Crew this year and looking forward to bringing you more awesome projects. I hope you will stay tuned for those and in the meantime I hope you will check out the rest of my posts!! Thank you for reading about my amazing project today! 
~Hugs~


Prima Dream Tag (Project for Feb. Helmar Project)

Hello everyone!! Jeanne here back with this 
awesome tag that I made for this month's 
project!! Today's project I decided I would 
use more of the Helmar Fabric Glue. Plus I had 
received a small haul of laces that I was super 
anxious to use and new it would look great with 
this amazingly new paper from Prima 
Marketing!! I hope that you feel inspired by this 
project to mix up laces, a little mixed media, and
 most of all inspired to have fun just as I did
 creating this tag!! 


I began my choosing my papers , in this case I had some left over papers from one of the new Prima collections called Amelia Rose. I absolutely love floral pattern, as well as black . I gathered most of the products I thought I might use from my stash and got to it! The tag I used is a tag that measure 6 1/4 X 3 1/2, its a great size to work with. I begin by adhering the tag directly onto the edge of the paper that I will be using. On this tag I used score tape to adhere the paper to the tag, I then cut along the edge with scissors. I find this easier than measuring the paper then adhering it to the tag but you can do what you find is easiest for you. I then used my Prima distress tool all along the edges of the tag to distress a bit and sort of blend the edges of the paper and tag together. 


I then ripped a piece of the paper with the black and pink floral background, I used a punch on one end and distressed the rest of it with my distress tool, I then added Black Soot Distress Ink around the edges. I had bought some small packs of paper doilies @ Joann's $2 section and picked out pink, dark gray, & white packages. So I chose to use this gray one, I cut in half so I don't waste a whole one that will be covered by paper. So I adhered that first, I had cut a small piece of pink lace to put across the tag, so for that I used Helmar Fabric Glue , and lastly adhered the small piece of torn paper , I used Acid Free Glue on both the paper a doily. 


Once I was finished with that, I begin embellishing with some a piece of matching ephemera from the paper collection. I adhered it using the Liquid Scrap Dots which is one of my favorite adhesives from Helmar! I added some stunning lace at the bottom of the tag as well. I adhered that with the Fabric Glue from Helmar as well. I had some matching crystals so I added a few of them in different areas of the tag and used the wonderful adhesive Helmar Gemstone Glue. I then added a grommet to the top using my crop a dile  and added some black seam binding . 


  I also wanted to add something extra for more details so I added some Prima Sugar in Pink, Black and White to the Prima flowres I had added. Once I was finished with that I splattered some glimmer mists from DecoArts. I lastly added some DecoArts Liquid glass on the small "Note" ephemera 


I hope that you all enjoyed this project share and 
I will be sharing this on all of my social media 
sites as well. I also hope that I have inspired you
 in some little way!! 
~Hugs~